Categories
Blog Workshops

Seeing Beauty Where You Are

My friend Tuan Pham will be presenting some new material at the National Arboretum in March.
 
Generally, people breathe without knowing that they are breathing. An unconscious act that keeps us alive. Many see in a similar fashion -mindlessly- without recognizing they are seeing. Over time inattentive blindness sets in; the joy of seeing goes out the window. Seeing happens without thought; a rose is a rose is a rose.
 
Mindful seeing wakes up the sensory organs. It reengages that sense of innocence, creating opportunities for endless transformative changes. Changes to the way we create art… and live life.
 
Tuan’s latest presentation is a synthesis of teachings on “insightful observation.” Drawing from works by masters in art, science and mysticism. Tuan combines this with his personal experiences in nature photography and mindfulness practice. He illustrates a common-sense approach to creating space for beauty to appear. To allow the child-artist within to come out and play.
 
This will help you to differentiate the four levels of seeing, or “Four Eyes.”
  • Eye-1 sees the familiar forms and labels, the things that everyone sees
  • Eye-2 takes time to look past appearances for subtleties, interdependence, inner connection, and the “what else?”
  • Eye-3 roams in and out of consciousness, between inner and outer landscapes, for different perspectives. Looks beyond the status quo
  • Eye-4 sees with complete presence, openness, and receptivity through the lens of “emptiness.”
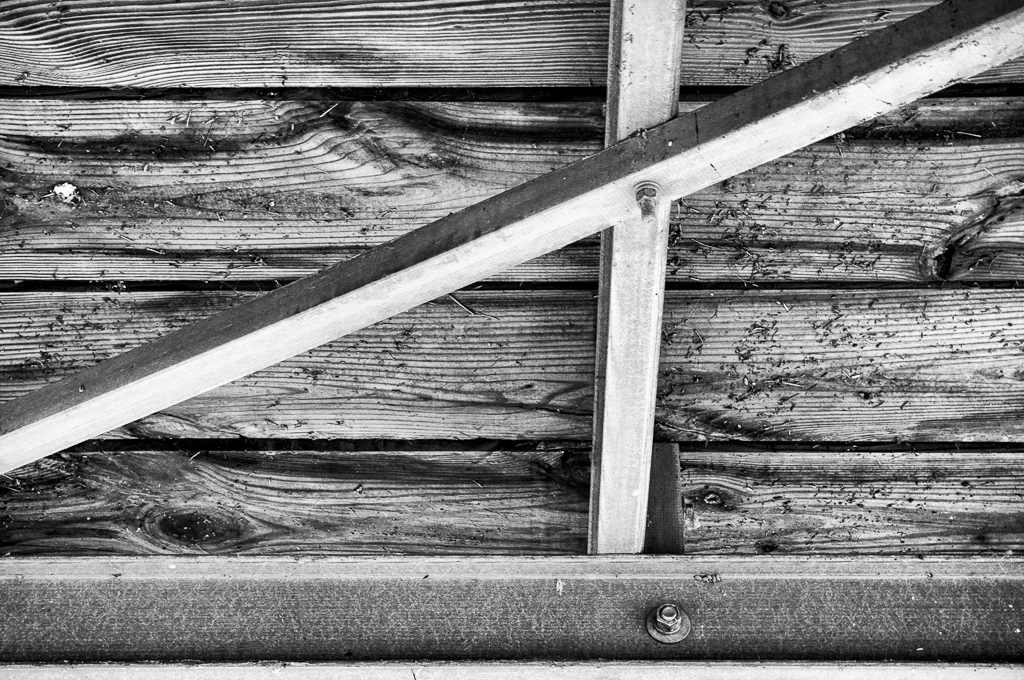
Tuan has chosen photographs for the presentation that he took locally. He demonstrates that one need not travel long distances, climb tall mountains, or wake up before dawn to find beauty. There is beauty where ever you are.
 
Join Tuan at the US National Arboretum on Saturday, 31 March from 1:30 to 3:30pm. The cost is a mere $25, and you must register in advance.
 
His presentations are deep, beyond the technical, where the artist inside you lies.
Categories
Blog Exhibit News

7th Annual Abstract Exhibit Open

“I’ll get out there next week,” John stated.
“But by next weekend it will be gone,” replied Carla.

Annual Photography Exhibit

For our 7th consecutive year our exhibit is live and in progress.  As of Saturday, 6 May, the 7th Annual Joseph Miller Abstract Photography Exhibit is open.  The exhibit hall is open from noon to 5pm every Saturday and Sunday in May.  We will also open it one last day on Monday, 29 May 2017.
There is a fantastic collection of abstract photographs at the Center. Some people create their art at the snap of the shutter. Creating an abstract vision from something they’ve seen or created. Others create a new vision from their extensive collections of images. Applying filters or processing techniques to portray what they’ve seen in their mind.
This exhibit allows for unlimited adjustments. Relying on the final image to express the maker’s concepts. The one rule is that the original work must have come from a photograph. Any technique is possible, with Rounding filters, Reverse Montages, Solarizations, or Swirl filters. Some in-camera techniques are intentional camera movement, textured glass, smoke, and architectural details.
 
Each exhibit has a unique flow, and this one is no exception. Curator Amie Tannenbaum does an exceptional job creating a museum-like experience. She produces an environment where drastically different images work side-by-side. This is definitely the finest Abstract Photography exhibit in the Washington metro area. It may be the finest exhibit in country.
 
If you have the opportunity, you should come by the Artist’s Reception, beginning at 2pm on Sunday, 7 May 2017.
 
You don’t want to end up like John, a day too late to see the exhibit in person.
 
For those of you who do miss the exhibit? We expect to have all the images posted on the NVACC website, along with previous years.

How to get there

The exhibit is in Gainesville at the Joseph Miller Center for the Photographic Arts.  The address is 4811 Catharpin Road, Gainesville, VA 20155.
 
Tell Joe that you heard about it here!


Categories
Blog

SoFoBoMo 2016 – Finally Finished

I had my doubts right up until the last minute… but was able to finish.

Finally Finished

I started my SoFoBoMo 2016 book on 3 July, a holiday weekend when I had three straight days to work on the book.  I shot quite a bit on the 3rd and 4th, but had other commitments the following weekend.  I had a week of leave planned starting on the 16th.

Interrupted by work demands, my week of leave turned into a single day off.  I spent that day at a motorcycle racetrack trying to see if I could go as fast as my motorcycle.  No wrecks but I did run off the track once.  Not terrible for my second time on a road course.  Especially with a ten year gap between the two days.

My point is, if I can get back around to it, life happens.  I got one more weekend to work on the book, 30 and 31 July.  I had to process my photos in about a day, sequence and produce the book the next day.  I finished just after midnight on Tuesday, 2 August.  Exactly 31 days from when I started.

Is it the best work I’ve ever produced?  No, it isn’t.

Am I happy with the result?  As happy as I could be.

Life has continued and I’ve been too busy to write anything about the experience.  But I’ve got a small gap in feeling overworked and I figured I should put some thoughts on paper.

  • Even as stressed as I’ve been about work over the month, I was still able to find a little time.
  • Books do not take as much time to create as we tend to believe.  Our preconceived notions are often overkill.
  • No matter how much time we spend on something, we feel like there is more we could have done.

So I guess I’m saying if I had it to do over again, I’d do some things different.  And I’m still happy with the result and the fact that I did the work to finish the book.

Categories
Blog

SoFoBoMo 2016 – The Artist Statement

“The secret of getting ahead is getting started. The secret of getting started is breaking your complex, overwhelming tasks into small manageable tasks, then starting on the first one.”

— often attributed to Mark Twain in error

Working my book like all my life.  I tend to grab something that makes a big dent first, then knock things off one small item at a time.  It is the method I’ve developed for accomplishing a lot in a short period of time.

triangles-19


Artist Statement

I chose triangles as a unifying theme for my book.  It is a subject from Freeman Patterson’s book “Photography and the Art of Seeing.”  We find triangles everywhere and they are an important element of composition.  From a psychological perspective, we ascribe male or masculine attributes to triangles.  I favor abstract representations in my photography.  For this book I chose to include a wider variety of techniques.  I have included landscapes, nature and architecture as well as abstracts.

I create my photographs with a range of digital cameras from Canon and Sony.  I photographed all my subjects with a Sony NEX-6 compact, mirrorless camera.  To process the photos, I used Adobe Lightroom, Photoshop and Nik filters.  Viveza and Color Efex Pro are the filters I used most.  When processing images I go for the feeling I recall when looking at the subject.  This process leads to variations in the adjustments that may be unacceptable to some.

Photography reduces the stress I feel in my life.  It is one of the few pursuits in my life that has no purpose other than my pure enjoyment.  It gives me an outlet for emotions long divorced from conscious self.  For that reason I strive to present that emotion in my images.


I ended up being happy with twenty-three of the images I took on Sunday, but narrowed that down to eighteen.  So in two days, I’m almost halfway to done.  I doubt that I will use all eighteen, but I would not feel bad if I did.

Categories
Blog Uncategorized

My SoFoBoMo 2016 Project Begins

“What was that you were saying, asked Fred?  I’ve got so much on my mind I can’t seem to get anything finished.”

“If you’re feeling overwhelmed, why don’t you go take some pictures?  You know it relaxes you replied his girlfriend Kathy.”

Today I am starting my SoFoBoMo 2016 project, I’ve decided to work on a personal project of Triangles.

I tend to shoot abstract photographs when left to my own devices.  But for this project I have decided to mix it up a bit and include a variety of techniques.  With each image I am trying to build in a triangle as a dominant design element.

triangles-179Today I visited a local park where there are playing fields, lots of trees and a stream.  Of the images I shot this morning, my favorite is the one on the right.  I am intrigued by the triangle created with the two sprinklers as they cross over the bench.  It directs my eye up into the leaves of the trees in the background.

For landscapes I use triangles as a base for my image more often than any other way.  But for this image, I like the positive message created by an upward-pointing triangle.

Of course I could not resist abstracts completely.  I took several, some stairs, close ups of playground equipment, some motion-blurred trees.

Only time can tell what will make the final cut.  I’ll be working on an Artist’s Statement for my book over the next couple of weeks.  I’ve found that often images I like will not fit the statement and I must cut them.  I also find this to be an essential aspect of developing a “body of work.”  The Artist’s Statement drives my final edit.  Much in the same way a magazine story will dictate the images that get selected.

SoFoBoMo 2016

If you are looking for something constructive to why not start your SoFoBoMo book?

Categories
Blog

SoFoBoMo 2016 Starting Soon

“I can’t do that, exclaimed Valerie!  I don’t know enough about publishing to write a book.”

That is the initial reaction of so many of the people I’ve spoken with about SoFoBoMo. The Solo Photo Book Month is a project that pits you against yourself.  Pick any contiguous thirty-one days between 1 July and 31 August 2016.  Choose a subject, photograph it, edit and arrange the images, and create a photo book.  No fuss, no muss.

The cold reality is that most of us are just not motivated to deal with the potential pitfalls.  We find it hard to get motivated.  We find it hard to maintain focus.  We find it difficult to get done!

But that is one of the greatest aspects of SoFoBoMo.  There is no time to worry about what MIGHT happen.  There is no time to choose the BEST format.  There is no time to doddle.

Because you only get thirty-one days to complete the project, you have to keep moving.  You can shoot something with which you are familiar and cut your learning curve.  Or you can crash on something completely new to push the envelope.

Planning for SoFoBoMo

You must develop the entire book’s contents within the thirty-one days of SoFoBoMo.  But you can prepare for the event.  Consider the following before you start:

  • Subject – What do I want to shoot?
  • Theme – How and where do I want to shoot it?
  • Software – What software do I need?  What do I need to practice in that software before the event?
    • Photo editing software
    • Book editing software
    • Slideshow software
    • PDF conversion software
  • Hardware – What hardware do I need?  What do I need to practice with that hardware before the event?
    • Camera
    • Tripod
    • Flash / Strobe
    • Remotes
    • Scrim
    • Reflector
    • Etc.

SoFoBoMo Ideas

Some subjects / themes that I have seen:

  • My local area – shot as street photography
    • Uses “normal” lenses
    • Monochrome is pretty standard
  • My dog / cat / pet
    • Can be indoors, outdoors or both
    • Can be with or without people / family
  • Selective color – digital darkroom technique that still requires some form of subject matter
  • Macro – field technique that still requires some form of subject matter
  • Travel – document your vacation in book form

The most important part is that you sign up for SoFoBoMo 2016.  We look forward to seeing what you can create.

Categories
Uncategorized

6th Annual Abstract Photography Exhibit Open

“I missed Julie’s soccer game?  I thought they were playing here next weekend!”

How many times has that happened to you?  You had plenty of time to schedule the meeting, but you just plain forgot.  A couple of months ago I missed the Irving Penn: Beyond Beauty exhibit at the Smithsonian.  Don’t let that happen to you with the Abstract Photography Exhibit.

Annual Photography Exhibit

As of Saturday, 7 May, the 6th Annual Joseph Miller Abstract Photography Exhibit is open.  The exhibit hall is open from noon to 5pm every Saturday and Sunday in May.  We will also open it one last day on Monday, 30 May 2016.

This year’s exhibit is an ecclectic collection of abstract photographs.  Many of the images are straight photography, while others are complex manipulations in Photoshop.

The rules of this exhibit allow for any and all adjustments.  Unlike many photography exhibits there is no limit to the manipulation.  The exhibit attracts Rounding filters, Glowing Edges effects, and Solarizations.

I have attended each of the exhibits since its inception.  They each have a different flow and feel.  They are the don’t miss event of abstract photography in the Washington Metro Area.

As of Saturday, 7 May, the 6th Annual Joseph Miller Abstract Photography Exhibit is open.  The exhibit hall is open from noon to 5pm every Saturday and Sunday in May.  We will also open it one last day on Monday, 30 May 2016.

I will be attending Artist’s Reception today.  It is a great opportunity to meet fellow abstract lovers and discuss what you like and don’t like in the show.  I know several people whom I will be asking where they find their inspiration.

How to get there

The exhibit is in Gainesville at the Joseph Miller Center for the Photographic Arts.  The address is 4811 Catharpin Road, Gainesville, VA 20155.

Tell Joe that you heard about it here!

Categories
Actions Photoshop Technical Techniques

Rounding Action

I’ve run into a number of photographers entering the Joseph Miller 5th Annual Abstract Photography Exhibit who are taking advantage of what I keep referring to as a Rounding filter.

Although I am not especially fond of the effect, with the right source image it can produce a very appealing final image.

Because it simply takes advantage of the Polar Coordinates filter in Photoshop, I wrote a quick action to execute the filters in the right order.  I could not find an effective way to produce the square image.  So I did not include that in the action.

This technique allows you to take an image like this:

chicago-2014-32-Edit_1024
Harris Theater at Millennium Park

And Rounding it to produce an image like this:

Rounding Image of Millennium Park


The action takes only seconds to run, even on full-size images.  It is included in my Tools Action set.

The technique is simple, using the Polar Coordinates filter by doing the following:

polar-to-rectangular for RoundingConvert the image using Polar to Rectangular coordinates:

  1. Filter -> Distort -> Polar Coordinates…
  2. Select Polar to Rectuangular
  3. Press OK

Rotate the image 180°:

  1. Image -> Image Rotation -> 180°

rectangular-to-polar for RoundingConvert the image using Rectangular to Polar coordinates:

  1. Filter -> Distort -> Polar Coordinates…
  2. Select Rectangular to Polar
  3. Press OK

For my images, I prefer a square format because it makes the image more symmetrical.  This is an effect that I continue to strive for, despite the fact that it can be considered a static composition.

resizeCreate a square format:

  1. Image -> Image Size…
  2. Uncheck Constrain Proportions
  3. Set a Width that is equal to the Height
  4. Press OK

Of course with the action it is a simple press of the Run button to produced the Rounding image.

If you are looking for something artistic to do on those cold winter days this could be the solution to your problem.  Because the action runs so quickly it is easy to try it on image, after image, after image.

If you decide to print one of these images, you may find that the circle created by the polar coordinates comes too close to the edge of the print and you can’t matte it without covering part of the circle.

To resolve this problem, use the eyedropper tool to select the color of one of the smooth corners of the image.  Then you can extend the canvas by 10% using the foreground color (just selected by the eyedropper tool).  The extended canvas will be transparent, since it matches the edges of the image.


Categories
Actions Photoshop Technical Techniques

New Actions as Editing Tools

I was reading some blogs about photography this past week and ran across this article with a unique and effective tool for identifying editing flaws, particularly in smooth texture areas.

The technique was not complicated, so I wrote an action to create the layers.  I included this technique in a Tools Action along with some tools that I’ve written about before and will write about in the future.

To use this action you need to import the action into Photoshop.  Once it is imported you can expand the “mgs Tools” folder in the Actions panel, select the Solar Cleanup Detector.  Just press the run button “›” and it will create the two layers.

Solar Cleanup

The top layer will be a Solar Cleanup Detector which consists of the absurd Curves layer.  The selected layer below that named Cleanup is where you can use the Clone Brush or Healing Tool to make edits.  Like the original article, you need to choose sampling from Current and Below.

layers

Your image will likely look terrible with this effect turned on, however even minor variations, like the left edge of the image below, can be identified.  You do not have to disable the Solar Cleanup Detector while you are editing on the Cleanup layer, so you can see how effective your edits are while you are working.

solarized_image

Once your edits are complete you can disable or delete the Solar Cleanup Detector layer and save your edited image.

In the future I’ll provide more details on the other tools included in this package, like the Lab Color and Rounding actions.

chicago-2014-32-Edit_polar
Rounding Action Effect Copyright © 2015 All rights reserved
Note:  Some of my actions will automatically flatten your layers to reduce the variables while running the action.  If this is not something you want, make sure to save your edit as a new image.

Fstoppers is a photography/videography community started in 2010 by founders Patrick Hall and Lee Morris.  Their blog has become a regular read for me because it covers so many topics so well.

Categories
Blog News Reference Technical Techniques Video

Darkroom Equivalents

For all of you who never knew the wonders of a B&W darkroom, here is a video about the darkroom equivalents of some common Photoshop tools.

This week is Photoshop’s 25th anniversary and Lynda.com has produced a free video demonstrating some wet darkroom techniques that are commonly used in Photoshop’s digital darkroom.  It is great to see the dodging and burning techniques that were so common in the wet darkroom demonstrated by a master printer like Konrad Eek as he works his magic to produce a fine art print.

Nearly every tool in Photoshop has its roots in the wet darkroom and I love the comparison of the contact print to Bridge (or the Library module in Lightroom). Even the Unsharp Mask, which I have frequently heard attributed to Adobe making up names (thanks to Beyond Monochrome for the excellent resource) was invented, and named, in the wet darkroom.

Seeing the work that was involved in the wet darkroom is such a great reminder of the simplicity of performing effectively the same action in Photoshop.  Konrad has it right when he talks about the time and effort involved in retaining the information to create the same print a second time.  The notes and masks all had to be filed and managed, when Photoshop (and Lightroom) allow us to save all of that work within the file (or catalog) so the second print is the press of a button.

I personally never had much of an opportunity to work in the wet darkroom, however the few times I did, I remember being able to watch the print develop before my eyes.  And although I appreciate the speed and efficiency of the digital darkroom, there is something magical about the wet darkroom.

I feel a little bit of pity for today’s photographers who will never know the joy of seeing the image appear from that blank white sheet of paper.  As if it was always there, just waiting to be, if you’ll pardon the pun, “exposed.”